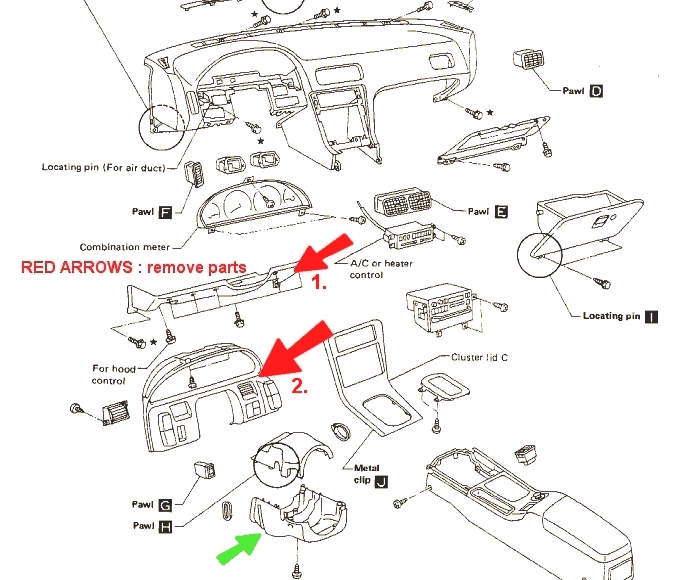
First you are going to remove
the lower steering panel (as shown in picture below,
refer to 1) then you are going to have to lower the
steering rack in order to remove the steering wheel/gauge
bezel by using the socket wrench with extension to
unbolt two gold colored bolts located on the bottom
of each side of the steering column behind the steering
column cover (pointed out in green) After removing
the two bolts, go ahead and push the steering wheel
down, it should be lowered enough to pull the gauge
bezel that has the head light buttons off.
 Then you want to remove the buttons
from the bezel. YOu have to pull them out from the front.
BE CAREFUL NOT TO DAMAGE ANYTHING!!!!!!!!. after pulling
the buttons off, you have to detach them from the wiring
harness by pushing in the little tab on them and use
a little force to remove them. With the steering rack
down and buttons out of the way, you can now take off
the steering wheel/gauge bezel.(refer to picture above
as 2)
Then you want to remove the buttons
from the bezel. YOu have to pull them out from the front.
BE CAREFUL NOT TO DAMAGE ANYTHING!!!!!!!!. after pulling
the buttons off, you have to detach them from the wiring
harness by pushing in the little tab on them and use
a little force to remove them. With the steering rack
down and buttons out of the way, you can now take off
the steering wheel/gauge bezel.(refer to picture above
as 2)
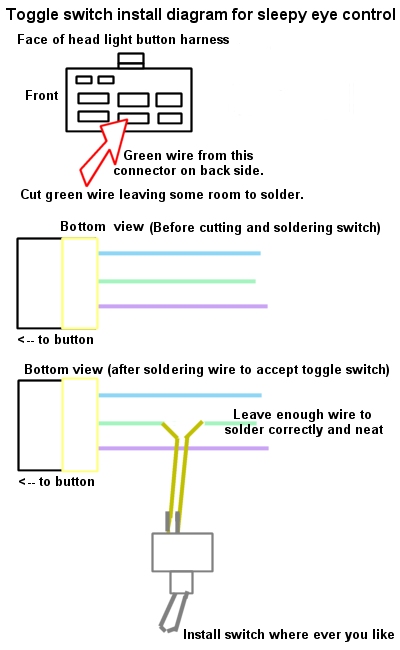
Now you want to get your toggle
switch ready. Plan out where you want to install your
switch. Make sure you leave enough wire to have room
to locate your switch. This part you can do it anyway
you want. I suggest after soldiering, use shrink wrap
to protect the wire after you solder. You can also
just twist the wires together and wrap them with electrical
tape if you don't know how to solder and use shrink
wrap, but that looks bad and can come off to cause
failure in your head lights. You have to work with
the pop up head light harness that you removed the
head light button from. Here is a diagram to work
with.
Try to run your switch wire
behind the dash to where ever you want to locate it
at. I ran mine through the center console and mounted
the switch next to the cigarette lighter. After you
mount your switch and put everything back together,
you can now try it out.
Turn the head lights on with
the arm switch to make sure they pop up, then turn
them off making the lights pop down. as they are going
down, turn your newly installed switch off. This will
make the head lights stop at the height the switch
was turn off. You can turn the switch off at any time
when the lights are going down to get a desired height.
NOTE, you cannot have your head lights on and have
sleepy eyes at the same time with this trick. If your
toggle switch is in the off position, the lights can
go back up and turn on if you make them, but they
wont go back down if you turn them down. For that,
you just turn the toggle switch on and they will go
down and work like normal. You will learn the procedure
quick and be able to do it easily. Thats all to it.